(US) Planned pooling..How do you do it?
Crochet is so popular right now! And planned pooling looks amazing! But how do you do it?
When using the planned pooling technique, you are the yarn boss! You are in charge and controlling what the yarn has to do. There are different ways to use the planned pooling technique. I'll tell you about the Argyl look, the Cat Candow method and pooling stripes.
What yarn to use?
You can buy al sorts of variegated yarn, but which one will pool and which won't? The length of the colors must be the same. If your yarn has pink, white and grey. The colors must be consistent. It must be the same length. You will have to get the same number of grey stitches out of every grey color sequence. The pink and white color doesn't have to be the same length as the grey color. The Greg color can have 5 stitches, the pink 3 and the white 7. The more stitches you get out of one color, the bigger your project will be. When you crochet one color sequence out of rhss zebra you'll have a scarf size project, but when you crochet one color sequence out of Ice gumball you'll have a blanket size project!

How do you start? (Moss Stitch)
The label will show you what size needles is suitable for your yarn. I start to chain with the smallest hooksize recommended.


With a bigger hook single crochet in the 4th chain from the hook, chain 1 and skip one starting chain. In the next chain, single crochet and chain 1. Make sure that when starting a new color, you start with a chain 1 that is the same. In the picture you will see that i finished my green with a single crochet and the chain 1 is dark purple.


Repeat sc and ch1 till you finished all colors of one sequence. I would advise to crochet with loose tension. That way you won't run into to much trouble when shifting colors or making turning chains. Write down the number of stitches you got per color.

In this picture you can see that my color sequence consists of 5 green stitches, 3 dark purple, 3 lilac, 5 white, 3 lilac and 3 dark purple. Now you can choose the way you want to pool!
Which pooling method will you choose?
There is this great site (plannedpooling.com). You can insert the amount of stitches you have per color and the total of stitches in one color sequence. This site wil show you what you can create!
In this first picture you see the pattern you'll get with one and a half color sequence. In my example one color sequence is 22 stitches. I added half a sequence (11) and entered 33 into the planned pooling tool. When entering one and a half sequence in the planned pooling tool, you'll get a better look at what the result will be.

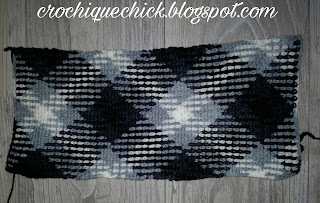
In this picture i made the colors shift. You can make your colors shift by removing one stitch in your total amount of stitches per row. This creates the argyl look.
You can't change the color sequence, but you can change the starting color. Try it to see if you like the pattern better if you start with another color.
Explaining the different methods:
The Argyl look!
Argyle look..Doesn't it look amazing? But how do they do it?

You start by chaining a full color sequence. With the new color on your hook, sc in the 4th stitch from the hook, chain 1, skip a stitch and *sc in the next, ch1 and repeat * till you crochted a full color sequence. I would recommend not to crochet to tight, because you will need to squeeze an extra stitch when turning to get the Argyl look.
Now you can write down how many stitches you made per color. You will be repeating this number for every color.
With moss stitch, you'll shift colors every other row. With only sc you'll shift colors every row. When shifting colors, you'll be bringing one extra stitch of the last color to the next row. You crocheted one full color sequence. Frog your last ch1 and sc. Ch 1 and turn your work. Sc in the chain space, ch1 (new color), sc etc. repeat until you rech the end of the row, chain 2 for turning and copy the row you just made. In this picture you'll see a scheme i made to keep up with the shifts. I find it very handy! You can also hook it as you go by sight. The scheme will show you how i shift every other row.

The Cat Candow method!

When working the 'Cat Candow method' you start the same as the argyl look. But after a number of rows you will have to start 'stacking' the colors. Stacking colors means that the colors will no longer shift and you'll be making stripes instead. As you can see in the picture above, you'll be 'Argylling' until your work starts crossing. Then you start to stack your colors. 5 to 8 rows will give this amazing look! When you finished stacking the colors, you will continue 'agylling'. Keep repeating this sequence; 'Argyl'till crossing, stacking for 5 to 8 rows, and you have Cat Candowed it!
Stripe pattern
Crocheting a stripe pattern is the easiest way of planned pooling. You keep on crocheting full color sequences. chain 2 for turning chains.
Hopefully this will get you started. Planned pooling is a big challenge for a lot of people! If you have any questions, please let me know. You can fill in a contact form, or message me on Facebook. Make sure to subscribe to keep up with my latest projects, video tutorials and more!

When using the planned pooling technique, you are the yarn boss! You are in charge and controlling what the yarn has to do. There are different ways to use the planned pooling technique. I'll tell you about the Argyl look, the Cat Candow method and pooling stripes.
What yarn to use?
You can buy al sorts of variegated yarn, but which one will pool and which won't? The length of the colors must be the same. If your yarn has pink, white and grey. The colors must be consistent. It must be the same length. You will have to get the same number of grey stitches out of every grey color sequence. The pink and white color doesn't have to be the same length as the grey color. The Greg color can have 5 stitches, the pink 3 and the white 7. The more stitches you get out of one color, the bigger your project will be. When you crochet one color sequence out of rhss zebra you'll have a scarf size project, but when you crochet one color sequence out of Ice gumball you'll have a blanket size project!

one color sequence on this pic is:
green, dark purple, lilac, white, lilac, dark purple
How do you start? (Moss Stitch)
The label will show you what size needles is suitable for your yarn. I start to chain with the smallest hooksize recommended.

Start chaining one full color sequence. The loop on your hook should be the same color as the color you started with.

With a bigger hook single crochet in the 4th chain from the hook, chain 1 and skip one starting chain. In the next chain, single crochet and chain 1. Make sure that when starting a new color, you start with a chain 1 that is the same. In the picture you will see that i finished my green with a single crochet and the chain 1 is dark purple.


Repeat sc and ch1 till you finished all colors of one sequence. I would advise to crochet with loose tension. That way you won't run into to much trouble when shifting colors or making turning chains. Write down the number of stitches you got per color.

In this picture you can see that my color sequence consists of 5 green stitches, 3 dark purple, 3 lilac, 5 white, 3 lilac and 3 dark purple. Now you can choose the way you want to pool!
Which pooling method will you choose?
There is this great site (plannedpooling.com). You can insert the amount of stitches you have per color and the total of stitches in one color sequence. This site wil show you what you can create!
 .
. 
In this picture i made the colors shift. You can make your colors shift by removing one stitch in your total amount of stitches per row. This creates the argyl look.
You can't change the color sequence, but you can change the starting color. Try it to see if you like the pattern better if you start with another color.
Explaining the different methods:
The Argyl look!
Argyle look..Doesn't it look amazing? But how do they do it?

You start by chaining a full color sequence. With the new color on your hook, sc in the 4th stitch from the hook, chain 1, skip a stitch and *sc in the next, ch1 and repeat * till you crochted a full color sequence. I would recommend not to crochet to tight, because you will need to squeeze an extra stitch when turning to get the Argyl look.
Now you can write down how many stitches you made per color. You will be repeating this number for every color.
With moss stitch, you'll shift colors every other row. With only sc you'll shift colors every row. When shifting colors, you'll be bringing one extra stitch of the last color to the next row. You crocheted one full color sequence. Frog your last ch1 and sc. Ch 1 and turn your work. Sc in the chain space, ch1 (new color), sc etc. repeat until you rech the end of the row, chain 2 for turning and copy the row you just made. In this picture you'll see a scheme i made to keep up with the shifts. I find it very handy! You can also hook it as you go by sight. The scheme will show you how i shift every other row.

The Cat Candow method!

When working the 'Cat Candow method' you start the same as the argyl look. But after a number of rows you will have to start 'stacking' the colors. Stacking colors means that the colors will no longer shift and you'll be making stripes instead. As you can see in the picture above, you'll be 'Argylling' until your work starts crossing. Then you start to stack your colors. 5 to 8 rows will give this amazing look! When you finished stacking the colors, you will continue 'agylling'. Keep repeating this sequence; 'Argyl'till crossing, stacking for 5 to 8 rows, and you have Cat Candowed it!
Stripe pattern
Crocheting a stripe pattern is the easiest way of planned pooling. You keep on crocheting full color sequences. chain 2 for turning chains.
Hopefully this will get you started. Planned pooling is a big challenge for a lot of people! If you have any questions, please let me know. You can fill in a contact form, or message me on Facebook. Make sure to subscribe to keep up with my latest projects, video tutorials and more!
© 2017 CrochiqueNL, Marriëlle van der Gun. All rights reserved. This pattern is for personal use only. The pattern or parts of the patterns cannot be multiplied or republished in any way, or be altered or sold. The finished product of this pattern may be sold. For questions please contact : crochique.nl@gmail.com


Comments
Post a Comment